
AUD/JPY trades around 111.10 in early European trading Friday, extending its recent weakness as the Japanese Yen gains modestly against the Australian Dollar. Attention remains focused on the possibility of further Japanese action to limit excessive currency volatility. Japan’s Finance Minister Satsuki Katayama said Thursday that the principles behind the previous Japan-U.S. currency intervention remain in place. Meanwhile, the Bank of Japan has raised its policy rate to 1.25%, keeping monetary-policy expectations central to the yen outlook.
Yen Intervention Risk Supports JPY
The yen remains sensitive to official comments as USD/JPY trades at elevated levels. Japanese authorities have repeatedly warned against excessive and disorderly currency moves, while Katayama said the framework used during the July intervention remains valid. Reuters reported that Japanese authorities also conducted rate checks after the BOJ’s latest policy decision, a move often watched by markets for signs of possible intervention.
The Bank of Japan raised its overnight call-rate target to around 1.25% at its September meeting, the highest level in decades. The central bank’s website shows the next policy meeting is scheduled for October 29-30.
Higher Japanese rates can reduce the interest-rate advantage that has supported yen-funded carry trades. The issue has become more relevant as investors reassess the pace of further BOJ tightening.
- BOJ policy rate: 1.25%
- Next BOJ meeting: October 29-30
- AUD/JPY: Around 111.10
- Key psychological support: 111.00
RBA Outlook Keeps AUD in Focus
The Australian side of the cross presents a different policy backdrop. The Reserve Bank of Australia currently has its cash-rate target at 4.35%, with its next monetary-policy decision scheduled for September 29.
The RBA has maintained a restrictive policy stance because inflation remains above its target range. In its August decision, the central bank said inflation was still too high and noted that energy-related price pressures could keep inflation elevated for longer. It also retained the option of raising rates if upside inflation risks materialize.
That rate differential remains important for AUD/JPY because Australian yields can support the Australian Dollar relative to the Yen. However, expectations for further BOJ tightening and potential Japanese intervention can offset some of that support.
111.00 Support Tests Bearish Bias
From a technical analysis perspective, AUD/JPY remains below the 100-day simple moving average near 112.80. Price is also trading below the middle Bollinger Band, keeping the short-term structure tilted lower.
The 14-period Relative Strength Index is around 41.70. The reading is below the neutral 50 level but remains above 30, suggesting that selling pressure is present without placing the pair in deeply oversold territory.
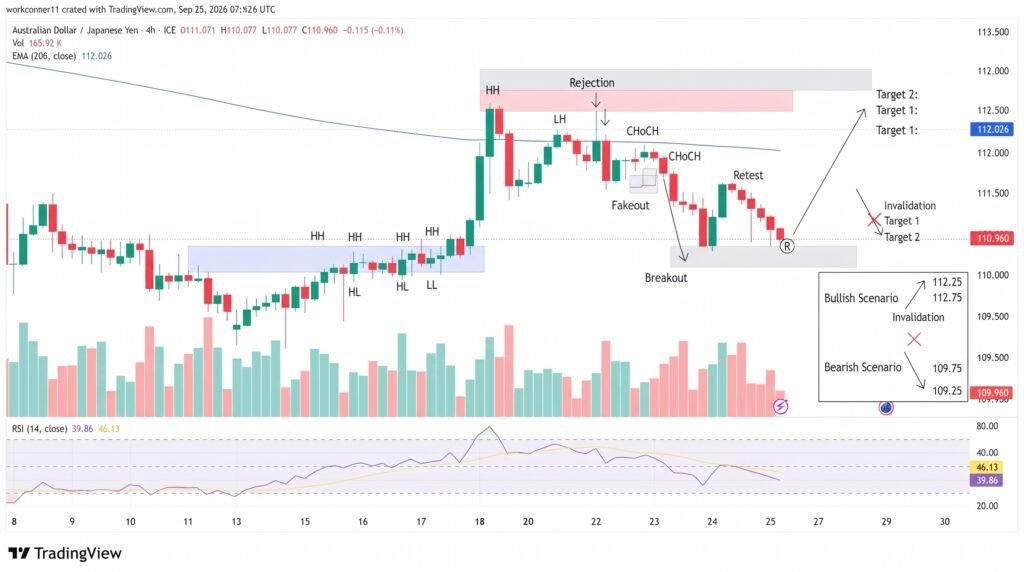
Key technical levels include:
- Initial resistance: 111.70
- 100-day SMA: 112.80
- Upper Bollinger Band: 114.18
- Key support: 110.00
- September 14 low: 109.67
- Lower Bollinger Band: 109.20
A sustained break below 110.00 could expose the September 14 low at 109.67, followed by the lower Bollinger Band near 109.20. On the upside, a recovery above 111.70 would bring the 100-day SMA at 112.80 into focus. A sustained move above that average would weaken the prevailing bearish technical structure.
Conclusion
AUD/JPY remains under pressure near 111.10 as the yen benefits from heightened intervention awareness and the BOJ’s move to a 1.25% policy rate. At the same time, the RBA’s 4.35% cash rate continues to provide a substantial yield differential in favor of Australia. Technically, 111.00 is the immediate psychological support, while 112.80 marks the key 100-day SMA resistance. Developments in Japanese currency policy and the RBA’s September 29 decision could determine whether the cross extends its decline or attempts a recovery.
Sources & Methodology
Primary-source standard: Market-moving facts should link to original data releases, regulator notices, company filings or official project announcements whenever available. Secondary reporting is used for additional context, not as a substitute for original evidence.
Page last reviewed: